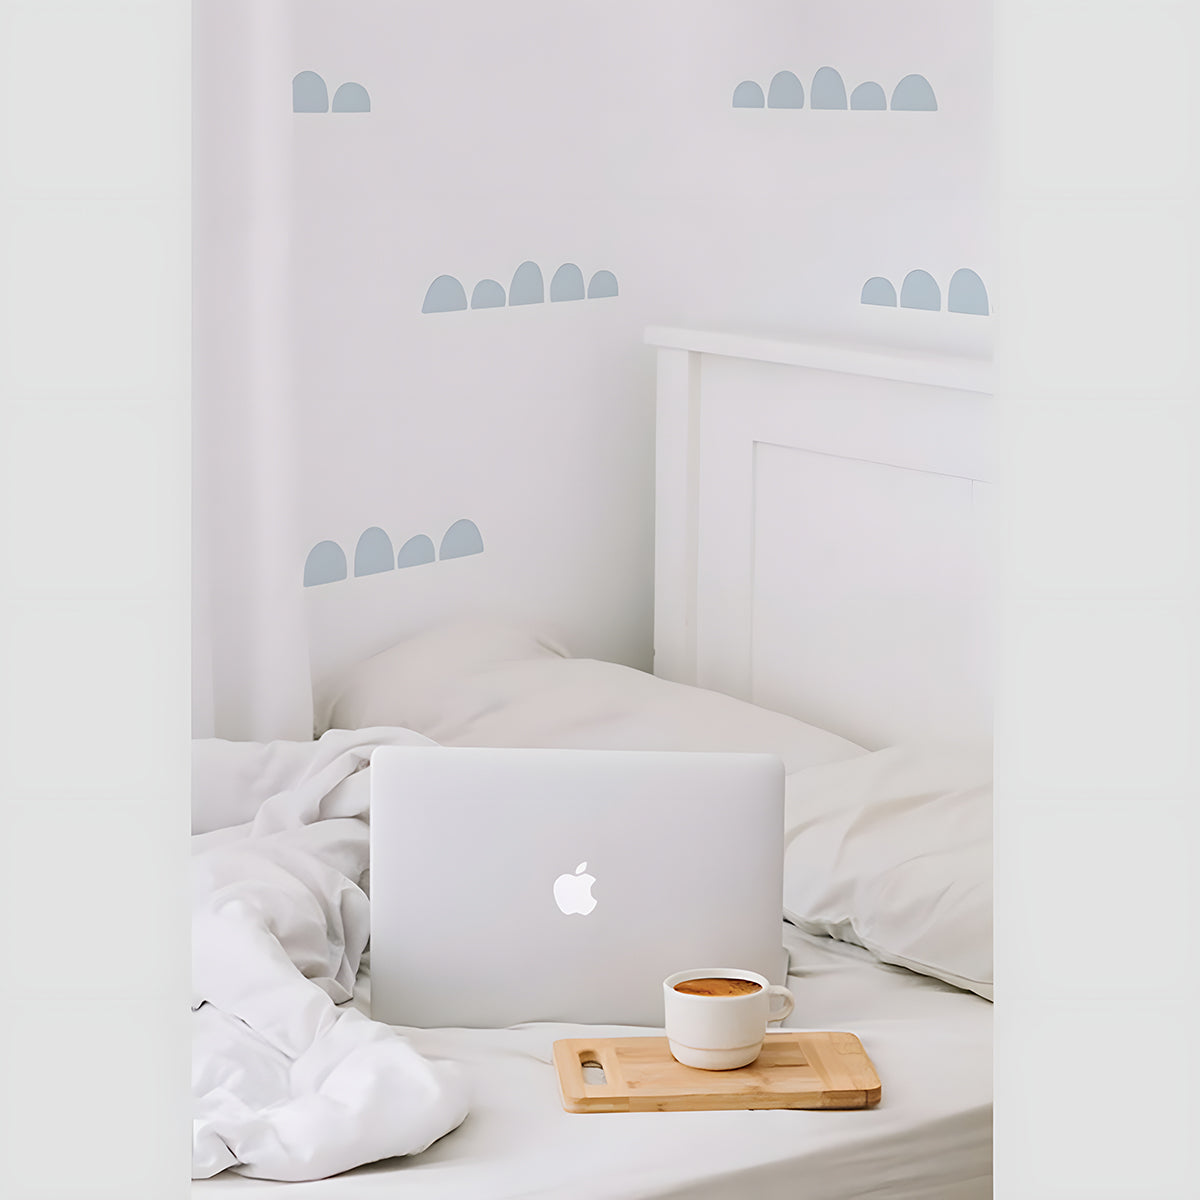


Wide Spaced Scallops,
Wall Decals
SGD 75.00
Unleash your creativity with Wide Spaced Scallops, Wall Decals! Each hump measures approximately H4-2cm x W3cm, allowing you to customize your design preference with either a 3-hump or 5-hump pattern. These versatile and playful decals offer a charming way to add a unique accent to your walls. Elevate your walls with these delightful decals, turning any room into a canvas for your artistic expression.
- Rooms: Ideal for various rooms including living rooms, bedrooms, and kid's nurseries, Wide Spaced Scallops Wall Decals bring a cute and whimsical touch to your living spaces!
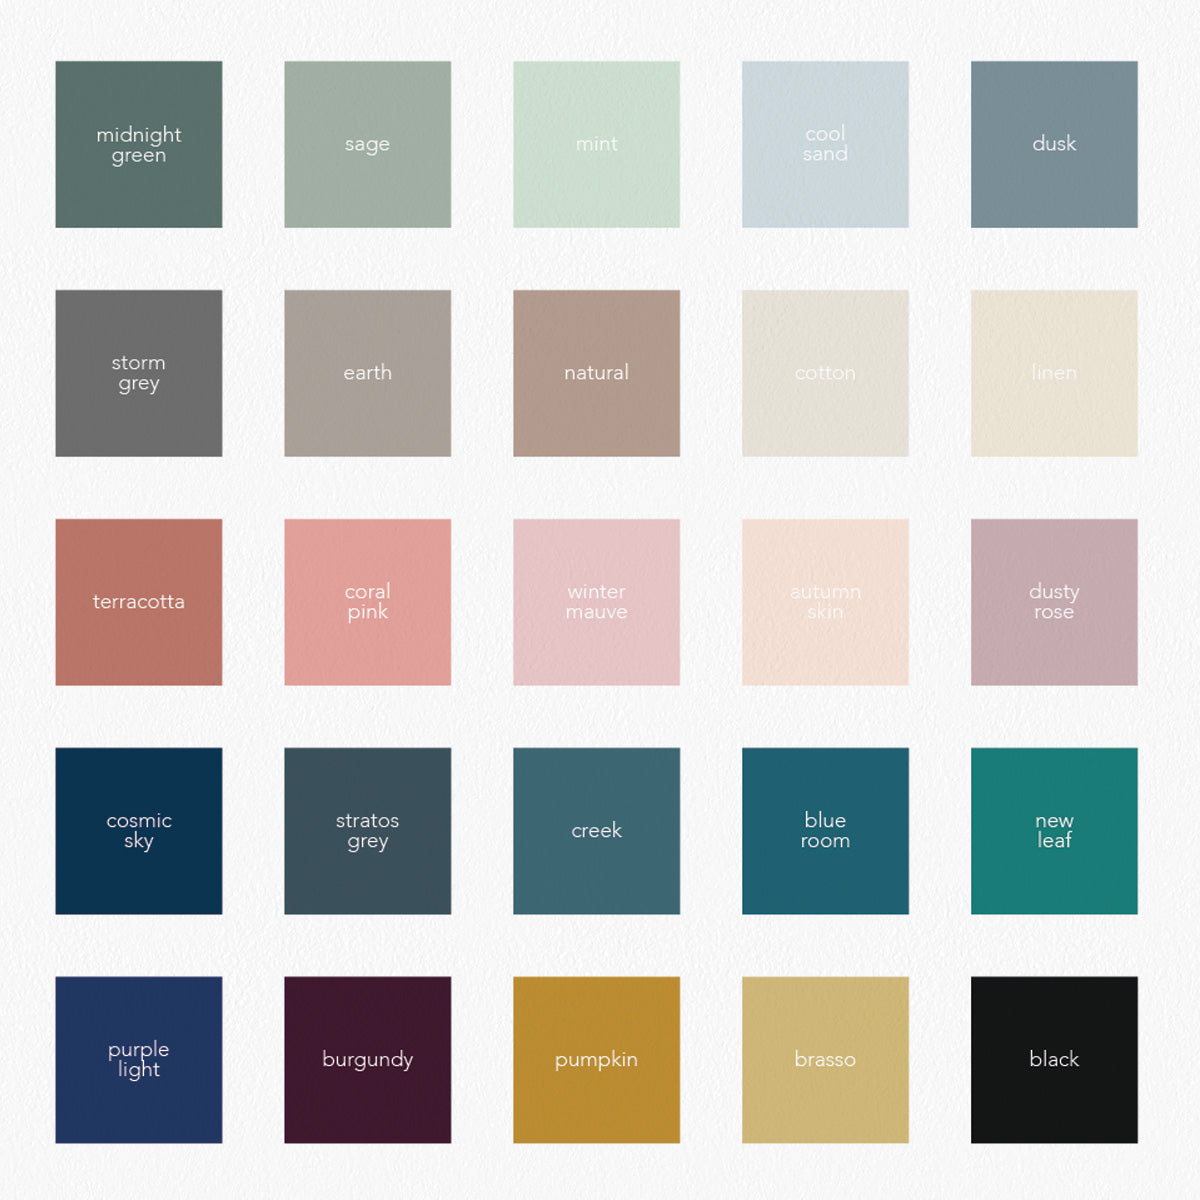
- Available in 25 colourways: Each pack includes a total of 70 individual hump stickers, with each hump measuring approx H4-2cm x W3cm
Recommended for a wall size of H250cm x W200cm


- Printed on specialized vinyl (with no edges or backgrounds) specifically designed for home decor
- Stickers are water resistant, you can wipe it off with a wet wipe
- Stickers are not repositionable. Repositioning will affect the adhesiveness of stickers. (Re-sticking will pick up dust and reduce stickiness)
- Long-lasting (think years!)
- Designed and made in Singapore
Our wall decals are printed on demand to maintain quality. Please note that orders will be dispatched in 10-13 working days. Local and overseas shipping applies.
FOR DECALS WITHOUT TRANSFER TAPE
- PREP THE WALL: Pre-clean your wall surface with soap and water and ensure the surface is dry and free of dust before proceeding. If the walls are freshly painted, please allow 4-5 weeks for your walls to fully settle before applying your decal.
- PLAN THE LAYOUT: Decals are for one-time use, so make a plan for where you would like to position your decals. Tape the decal to the wall surface with masking tape to ensure it's the exact placement. Use a bubble level or ruler if necessary.
- PEEL OFF THE WHITE BACKING: Using the masking tape to hold the decal its position, peel off the white paper backing from the decal and transparent transfer tape. Paste the exposed decal and transfer tape to the wall. Please note that once the white paper backing is removed, the adhesive is exposed so make sure not to fold over or wrinkle the decal.
- STICK THE DECAL: Paste the decals on the wall and and smooth it out with your fingers or with a credit card to ensure adhesion along the edges. In case of wrinkles or curls, you can pull it free if it sticks to itself, as gently and slowly as you can. For best results, do not stick wall decals on wet, uneven and textured wall surfaces.
FOR DECALS WITH TRANSFER TAPE
- PREP THE WALL: Pre-clean your wall surface with soap and water and ensure the surface is dry and free of dust before proceeding. If the walls are freshly painted, we recommend waiting 4-5 weeks for your walls to fully cure before applying.
- PLAN THE LAYOUT: Decals are for one-time use, so make a plan for where you would like to position your decals. Tape the decal to the wall surface with masking tape to ensure it's the exact placement. Use a bubble level or ruler if necessary.
- PEEL OFF THE WHITE BACKING: Using the masking tape to hold the decal its position, peel off the white paper backing from the decal and transparent transfer tape. Paste the exposed decal and transfer tape to the wall. Please note that once the white paper backing is removed, the adhesive is exposed so make sure not to fold over or wrinkle the decal.
- STICK THE DECAL, PEEL TRANSFER TAPE OFF: Now, starting at the corner, slowly peel or roll the transfer tape away from the decal at a 45° angle. Continue until the transfer tape is completely removed from the wall and decal. Continue to rub the remainder of decals on the wall and smooth it out with your fingers or with a credit card to ensure adhesion along the edges.


